이번 포스팅에선 카오스 엔지니어링을 할 수 있게 도와주는 라이브러리 Chaos Monkey For Spring Boot (CM4SB)에 대해 알아보겠습니다.
카오스 엔지니어링이란?
운영 중인 어플리케이션에선 항상 장애가 발생합니다. 자주 접하는 장애일 수도 있고 뜬금없는 장애일 수도 있습니다. 아무리 큰 기업이라고 해도 운영 중 장애는 발생하기 마련이죠.
이러한 장애를 미리 테스트해서 방지하는 걸 카오스 엔지니어링이라고 합니다.
카오스 엔지니어링에 대한 내용을 구글에 찾아보면 NETFLIX에서 하고있는 카오스 엔지니어링에 대한 내용이 많이 나옵니다.
카오스 엔지니어링에 대해 깊게 알고 싶으시다면 아래 링크에 나와있는 책을 읽어보시는 것을 추천드립니다.
카오스 엔지니어링의 원칙 :: Channy's Blog
차니 블로그(Channy Blog)는 오픈 웹, 웹 플랫폼, 웹 개발자, 오픈소스 소프트웨어, 빅 데이터 및 클라우드 컴퓨팅 등 다양한 IT 기술 주제에 대해 다루고 있습니다.
channy.creation.net
Chaos Engineering on Microservices - 윤석찬, AWS 테크에반젤리스트
Chaos Engineering on Microservices
www.slideshare.net
Chaos Monkey For Spring Boot (CM4SB) 란?
Netflix에서 만든 카오스 엔지니어링 툴입니다.
Chaos Monkey라는 라이브러리가 있는데 이를 Spring Boot에서 쉽게 사용할수 있게 만든 게 CM4SB입니다.
Chaos Monkey 말고 Gorilla, Kong도 있습니다. 신기하네요.

CM4SB 동작방식 및 설명
동작방식

공격 대상 : @Controller, @Repository, @Service, @RestController, @Component
Watcher : 감시자 (공격 대상 별로 Watcher가 존재)
Assault : 공격 종류
AOP를 이용해 공격 대상이 호출된 경우 대상 Watcher 활성화 여부를 판단한 후 활성화된 Assault들 중 랜덤하게 하나씩 골라서 공격합니다.
Assault, Watcher
| Assault | Watcher |
| 응답 지연 (Latency Assault) |
@RestController |
| 예외 발생 (Exception Assault) | |
| 애플리케이션 종료 (AppKiller Assault) | |
| 메모리 누수 (Memory Assault) |
Properties
설정 옵션들은 아래에서 참고부탁드립니다.
Chaos Monkey for Spring Boot Reference Guide
Chaos Monkey for Spring Boot can be customized to your planned experiment. You can decide which attacks you want to run and which parts of your application should be attacked. Property Description Values Default chaos.monkey.enabled Determine whether shoul
codecentric.github.io
HTTP Endpoint
카오스 멍키는 아래 ID를 통해 actuator를 통해 on/off를 할 수 있고 설정 값을 바꿀 수 있습니다.
| ID | 설명 | Method |
| /chaosmonkey | 현재 카오스 멍키 설정 정보 | Get |
| /chaosmonkey/status | 카오스 멍키 on/off 여부 | Get |
| /chaosmonkey/enable | 카오스 멍키 on | Post |
| /chaosmonkey/disable | 카오스 멍키 off | Post |
| /chaosmonkey/watchers | 현재 켜져있는 watchers 정보 | Get |
| /chaosmonkey/watchers | watchers 정보 수정 | Post |
| /chaosmonkey/assaults | 현재 켜져있는 assaults 정보 | Get |
| /chaosmonkey/assaults | assaults 정보 수정 | Post |
CM4SB 설정하기
pom.xml
chaos-monkey-spring-boot, spring-boot-starter-actuator 의존성을 추가해줍니다.
spring-boot-starter-actuator는 spring boot가 실행 중일 때 헬스 체크, 로그레벨 변경, 매트릭스 데이터 조회 등 다양한 작업들을 할 수 있게 해주는 라이브러리입니다.
//Maven
<dependency>
    <groupId>de.codecentric</groupId>
    <artifactId>chaos-monkey-spring-boot</artifactId>
    <version>2.3.9</version>
</dependency>

<dependency>
    <groupId>org.springframework.boot</groupId>
    <artifactId>spring-boot-starter-actuator</artifactId>
</dependency>

//Gradle
implementation group: 'de.codecentric', name: 'chaos-monkey-spring-boot', version: '2.3.9'
implementation group: 'org.springframework.boot', name: 'spring-boot-starter-actuator'
application.properties
# profile이 chaos-monkey로 되어 있어야 테스트 가능
spring.profiles.active=chaos-monkey

# chaosmonkey endpoints 활성화
management.endpoint.chaosmonkey.enabled=true
management.endpoints.web.exposure.include=health,info,chaosmonkey
CM4SB 테스트
위와 같이 설정한 후 Spring Boot를 실행하면 아래와 같이 문구가 추가되어 나오는 걸 볼 수 있습니다.
멋있지 않나요? ㅎㅎ

이제 테스트를 시작할 건데 아래 툴들을 사용할 겁니다. 자세한 설명은 링크에 가신 후 확인 부탁드립니다.
카오스 멍키 설정 변경 - HTTPies << 이 부분은 사실 .properties에 설정 다 한 후 테스트하셔도 무방합니다.
카오스 멍키 설정 변경 후 Assault 확인 - JMeter
카오스 멍키 설정 변경
@RestController 어노테이션이 붙은 메소드 호출 시 33% 확률로 1~3초 응답 지연 발생하도록 설정하겠습니다.
0. @RestController 생성
간단하게 하나 만들겠습니다.
package com.effortguy.perftest;

import org.springframework.web.bind.annotation.GetMapping;
import org.springframework.web.bind.annotation.PathVariable;
import org.springframework.web.bind.annotation.RestController;

@RestController
public class PerfTestController {

    @GetMapping("posts/{postsId}")
    public String getPosts(@PathVariable Long postsId) {
        return "perfTest postsId : " + postsId;
    }
}
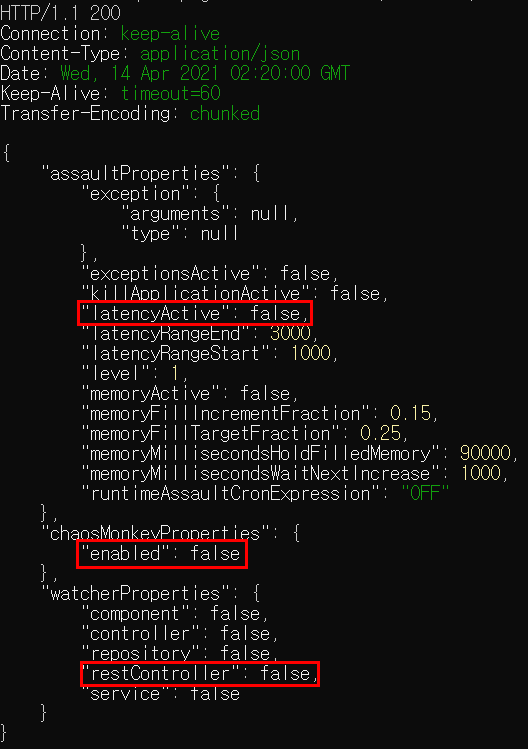
1. 현재 카오스 멍키 설정 정보 조회
http get localhost:8080/actuator/chaosmonkey
조회해보면 현재 카오스 멍키, latencyActive, restController watcher가 비활성화 되어있는 걸 볼 수 있습니다.

2. 카오스 멍키, latencyActive, restController watcher 활성화
@RestController 어노테이션이 붙은 메소드 호출 시 33% 확률로 1~3초 응답 지연 발생하도록 설정하겠습니다.
위 문장에 색있는 부분 설정을 해보겠습니다.
// 카오스 멍키 활성화
http post localhost:8080/actuator/chaosmonkey/enable

// controller watcher 활성화
http post localhost:8080/actuator/chaosmonkey/watchers restController=true

//latencyActive 활성화
http post localhost:8080/actuator/chaosmonkey/assaults latencyActive=true

3. 응답 지연 시간, 발생 시점 설정
@RestController 어노테이션이 붙은 메소드 호출 시 33% 확률로 1~3초 응답 지연 발생하도록 설정하겠습니다.
위 문장에 색있는 부분 설정을 해보겠습니다.
// 1~3초 지연 (latencyRangeStart, End)
// 33% 확률로 (level)
http post localhost:8080/actuator/chaosmonkey/assaults latencyRangeStart=1000 latencyRangeEnd=3000 level=3

테스트
이제 설정을 다 끝냈으니 테스트를 해보겠습니다. JMeter로 이전 포스팅에 했던 설정을 그대로 실행해보겠습니다.
33% 확률로 응답 지연이 발생한 걸 확인할 수 있습니다.

+ Exception Assault 설정 후 테스트 (Spring Boot 껐다가 다시 켜주세요.)
설정
// 카오스 멍키 활성화
http post localhost:8080/actuator/chaosmonkey/enable

// restController watcher 활성화
http post localhost:8080/actuator/chaosmonkey/watchers restController=true

// 33% 확률로 RuntimeException 발생
http POST localhost:8080/actuator/chaosmonkey/assaults level=3 exceptionsActive=true exception.type=java.lang.RuntimeException
결과

AppKiller, Memory Assault는 생략했습니다. 이에 관심있는 분들은 테스트 한 번 해보시길 바랍니다.
이외에 특정 메소드에 한정해서 공격을 하는 방법과 스케줄링을 해서 공격하는 방법이 있습니다.
카오스 몽키 꼭 카오스 엔지니어링할 경우가 생기면 꼭 써봐야겠네요.
'Spring' 카테고리의 다른 글
| [Spring] JMeter 사용법 - JMeter란?, 테스트 방법 (1) | 2022.09.07 |
|---|---|
| [QueryDSL] String to Int, Varchar to Number (castToNum) (1) | 2021.10.18 |
| [Spring] IntelliJ에서 Spring + JSP hot reload 설정하기 (재시동 x) (0) | 2021.02.17 |
| [Spring] IntelliJ에서 Spring + 톰캣 연동하기 (0) | 2021.02.17 |
| [Spring Boot] JetBrains Java Trend Analysis - 2020 vs 2019 (0) | 2021.02.04 |
댓글